Using VisGenie - Frame Ripper


Using VisGenie Frame Ripper

Introduction

Ripping Frames

Tips


INTRODUCTION

VisGenie Frame Ripper is a small gadget to extract image frames from video sequences. It supports all types of video sources as long as they are recognized in your Windows Media Player (for some types of video codecs, such as XVid or DivX, you might need to install the codecs seperately). You can freely define the target region and resolution to match your purpose. The ripped image sequences are saved as YUV files, which are perfect for video coding research. Also by the support from YUVGenius (now a built-in component of VisGenie), you can easily render and process these YUV files.

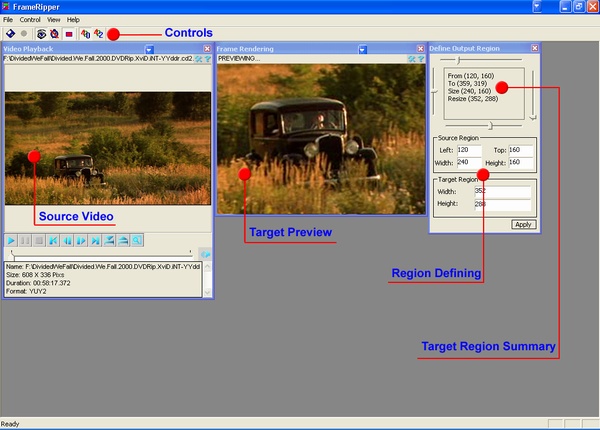
VisGenie Frame Ripper is located at "[VisGenie in Start Menu] / VisGenie Frame Ripper". Its GUI is shown below. The working space comprises of a video rendering window, an image rendering tool window, and a region defining dialog. The interface is straightforward and the usage is very convenient. Please see below for a quick usage instruction.

RIPPING FRAMES

YUV Format: Before you start, make sure you know the YUV formats YUY2 and IYUV.
Open the ripper: Open the ripper from "[VisGenie in Start Menu] / VisGenie Frame Ripper".
Open video source: Click on the "Open Source" button to select a source video file. Wait until the video is correctly loaded.

VisGenie Frame Ripper supports all video types recognized by Windows Media Player, including .avi, .wmv, .mpg, .asf, .vob, etc.
The image format of the input video sequence is set to be YUY2 for processing efficiency. If you have experience in using VisGenie Demo Studio and VisGenie SDK, you might know that you have freedom to modify this. However, in the ripper you are not recommended to do so. Otherwise your result will be unexpected or the ripper will be crashed.

Decide output YUV file format: The ripped image sequence will be saved into a YUV file. However, you have format options to choose between YUY2 and IYUV. These are two most frequently used formats for video coding and processing purpose. Choose the format you want by clicking the toolbar button "Planar IYUV (4:2:0)" or "Packed YUY2 (4:2:2)".
Specify output file name: Click on the toolbar button "Save As" to specify an output file name. Once the file is specified successfully, the command "Record" will be enabled in the toolbar. On how to render the YUV file, please refer to YUVGenius page.
Define the ripping region: From the dialog titled as "Define Output Region", specify the region you want to rip and the target resolution. You can do it by dragging the slider bar, or filling in specified dimension values. In the latter case, press "Enter" or click on the "Apply" button to take effect. Pay attention to the text information surrounded by the sliding bars, which is the effective setting for your ripping region. You can preview your ripping results from the preview window.
Recording: When you finish setting the ripping region, click the toolbar button "Record". Every frame thereafter will be written into the output file, unless you push the "Record" button again, which will end the recording.

TIPS

Disable the synchronization clock: Some operations (such as interpolation in re-sizing) in VisGenie Frame Ripper are time consumping, and therefore might not be achieved in a real time manner. As a consequence, you might observe serious frame dropping issue during the ripping. If this is not what you want, try to disable the synchronization by clicking the "Disable Synchronization Clock" button in the toolbar. This will guarantee a frame-by-frame recording regardless of the processing speed. Your setting will take effect next time when you open a video clip. For more information about synchronization clock, please refer to Video Genius Options.
You might want to navigate into the video session you are interested in before ripping the frames. To do this, firstly pause (NOT stop) the video rendering, and drag the sliding bar in the video window until you find the interested session. Then define your ripping region.
If you prefer other image formats (such as JPEG, Bitmap, TIFF, etc) rather than YUV, you can either convert the YUV files into your specified formats (unfortunately you have to implement this by yourself. The lucky thing is there are many image format converters available online even with source codes. Just google them), or refer to another convenient tool called Frame Dumper.


Summary

To learn more information, please refer to Using VisGenie Demo Studio and Using VisGenie SDK.

For problems or questions regarding this web page please contact with me at ywang AT ee DOT columbia DOT edu.
Copyright © By Yong Wang All Rights Reserved
Last updated: March 1st, 2005