| Using VisGenie SDK |
BACKGROUND
The following diagram shows the architecture of VisGenie. It is clear that VisGenie SDK is the kernal part of the while software, encapsulating the low lever system SDKs and providing user-friendly helper applications. Understanding better about VisGenie SDK will be beneficial in order to customize the VisGenie applications in a way you want exactly.

The following is quoted from Microsoft MSDN: The Microsoft Component Object Model (COM) is a platform-independent, distributed, object-oriented system for creating binary software components that can interact. COM is the foundation technology for Microsoft's OLE (compound documents), ActiveX? (Internet-enabled components), as well as others.
VisGenie SDK is heavily built upon COM because of its superb advangates of encapsulation and redistribution. One of the critical concepts in COM is the interface, which is a group of function declarations (but not implementations). Interfaces are more or less like the pure virtual classes in C++ language. After the interfaces are claimed, there should be some physical implementations supporting them. Usually these implementations are provided in a dynamic library link (DLL). VisGenie defines its own set of visualization interfaces and provides the corresponding implementations.
This document will not be a COM tutorial. Most of the details are encapsulated already and transparent to the users. Some fundamental knowledge will be mentioned little by little when it is necessary. In case you are interested, the book Inside COM is a good starting point.
DirectShow is the kernel part in Microsoft Windows System to provide media playback support. DirectShow uses an efficient framework based on COM and therefore has great flexibility in providing universal media rendering solutions. The basic concept in DirectShow is the filter. The DirectShow functionalities, such as capturing, decoding and rendering, are all implemented through various filters. The operation of these filters follows the mechanism of manipulating COM interfaces. Fortunately, the design philosophy of VisGenie is to hide the technical details of DirectShow as much as possible. Therefore most of time you don't need to worry about them. Of course, a better understanding about DirectShow will definitely be a bonus in using VisGenie. Interested users are refered to the Microsoft DirectX website for details.
You are strongly recommended to create your VisGenie applications through VisGenie AppWizard. VisGenie AppWizard is a very efficient tool to build up your video analysis applications without handling too many DirectShow / COM details, so that you can pay more attention on the implementation of your video analysis algorithms. Please refer to Instant VisGenie to know more details about how to use VisGenie AppWizard to create your VisGenie applications by clicks. When the project is created, what you need to do is to customize the generated codes so that your application fulfills your video processing requirement. For this purpose the knowledge of VisGenie SDK is necessary, which is the focus of the remaining part of this document.
This document assumes the users have the basic knowledge about Windows programming, such as C/C++, Window API, GDI, MFC, etc. If you cannot fully understand some illustration below, especially the parts where some DirectShow and COM concepts are involved, just accept them and focus on the contents how you can use VisGenie itself. .
You also need to configure your system before using VisGenie SDK.
All VisGenie projects must include the header file "IFace.h" and "IFaceEx.h", which contains the necessary defines of data structure, interfaces and GUIDs. They are located in the installation folder of VisGenie. You might want to read these files now and then in order to have a better understanding about the contents of this document.
Programming Using SDK
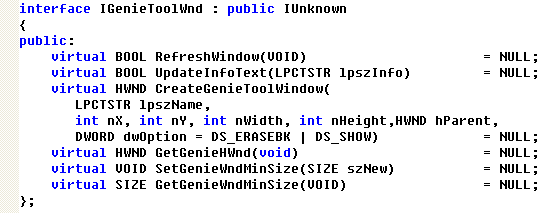
Declaration: An interface consists of a group of function prototype definition. All of these functions are the pure virtual function without implementation. The following codes define the interface IGenieToolWnd, which is the interface every VisGenie tool window supports.
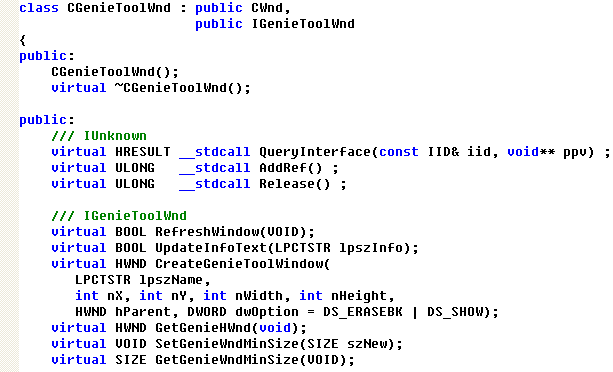
Realization: Since an interface contains only declarations, but not implementations. All of these declarations must be realized before the interface can be utilized. This is done by deriving a class from the interface. The following is the example where the class CGenieToolWnd is defined to realize all functions claimed in IGenieToolWnd.
GUID: Each interface needs to be registered into the system before it can be used. This is done by assigning a global unique ID (GUID) to an interface and record it in the system registry. GUID is a 128-bit structure generated in such a way that no two GUIDs in the world are the same. The following codes is the GUID for IGenieToolWnd defined in IFace.h.

Query Interface : You need to obtain an interface pointer in order to use the functions defined in it. There are several ways to obtain the pointer. The two basic ways are:
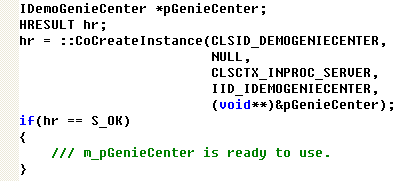
Apply the interface that has been registered in the system by creating an instance of a class that realizes the interface. This is done by call the function CoCreateInstance. The following example obtains the pointer for the interface IDemoGeneiCenter. CLSID_DEMOGENIECENTER is the class GUID registered in the system. IID_IDEMOGENIECENTER is the GUID for the interface interface IDemoGeneiCenter, which is the VisGenie control center.
Obtain the interface through the function QueryInterface. In the following example, piHost is the pointer of another interface (e.g., obtained from CoCreateInstance) implemented in a class where the interface IGenieToolWnd is also realized.

Release Interface: No matter how you obtain the pointer of an interface, when you will not use it any more, you must release the interface. Otherewise there will be memory leak issue and potential crash risk. This is done by calling the function Release() that must be realized for any interfaces.
![]() IDemoGenieCenter: VisGenie Control Center
IDemoGenieCenter: VisGenie Control Center
To simplify the procedure of obtaining certain interfaces, VisGenie provides a control center, IDemoGenieCenter, from which all of the interfaces for VisGenie tools are distributed. From the declaration below, it is clear that the only purpose of using IDemoGenieCenter is to obtain the interface pointers for all VisGenie tools.

In order to obtain the interface pointer for a VisGenie tool interface, follow the steps below:
Define an pointer for the interface IDemoGenieCenter.
Apply the interface from the class GUID CLSID_DEMOGENIECENTER.
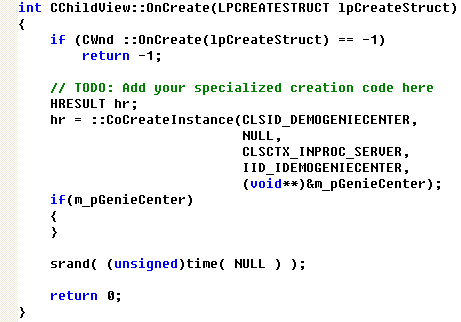
This procedure is usually done in the function OnCreate() of the main window where you want to add the VisGenie tool windows.
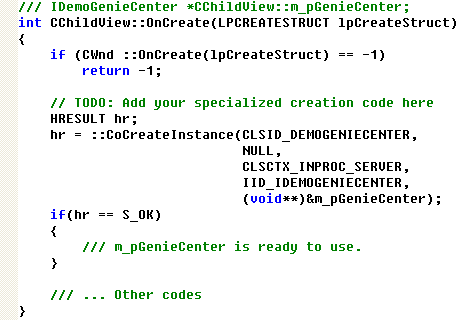
When you have the interface pointer for IDemoGeneiCenter, the next step is to apply for additonal interface pointers for specific tool windows.
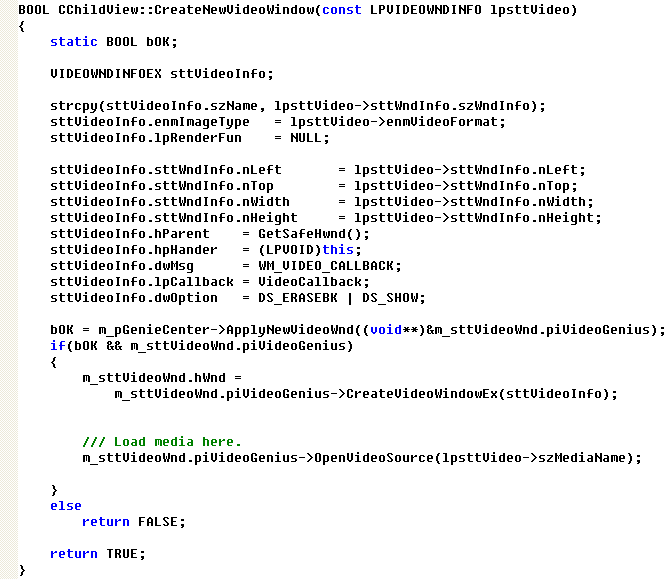
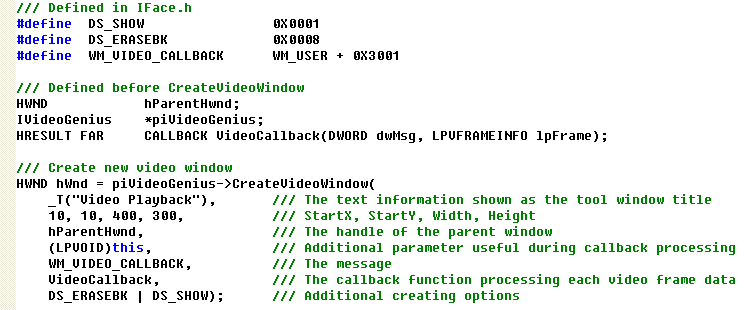
When the interface pointer for a specific tool window is ready, you can create it by calling its corresponding create function. Please check the file IFace.h and IFaceEx.h for the details about the create functions. Here is an example of creating a new video tool window.
![]() Basic Operations Of VisGenie Tool Windows
Basic Operations Of VisGenie Tool Windows
Every VisGenie tool implementation supports the IGenieToolWnd interface, which defines the basic window operation.

Here are the most freuently used operations:
BOOL IGenieToolWnd::UpdateInfoText(LPCTSTR lpszInfo): Update the metadata description text.
HWND IGenieToolWnd::GetGenieHWnd(void): Obtain the window handle. Through this handle all of basic window operations can be executed.
VOID IGenieToolWnd::SetGenieWndMinSize(SIZE szNew): Set the minimum window size during window resizing..
![]() Understanding VisGenie AppWizard Codes
Understanding VisGenie AppWizard Codes
VisGenie AppWizard has already helped you encapsulate most of the steps above. To know more about how to create applications using VisGenie AppWizard, please refer to Instant VisGenie. In this section the codes generated by VisGenie AppWizard will be explained so that you know where to go when you want to modify the code based on your desire.
Before you continue this document, please generate a VisGenie project through AppWizard with the following settings:
Name the project as "Test".
Include a video tool, a curve tool, and an image tool.
Do not select any video file.
Use synchronization clock.
Use RGB24 format.
The following codes are necessary for all VisGenie application, which is included in the file StdAfx.h.
:
In the function member "int CChildView::OnCreate(LPCREATESTRUCT lpCreateStruct)", a pointer to IDemoGenieCenter interface is created.
When you click on the "Go" button on the tool bar, the following codes are executed, where the specified tool windows are created:
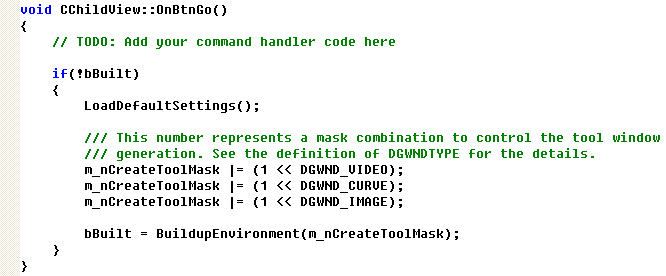
In the function member CChildView::BuildupEnvironment(), the tool windows are created if necessary:

In the function member CChildView::CreateNewVideoWindow(), the video window is created. All of other tool windows are also created using the following members:
All other tool windows are created using similar function members.

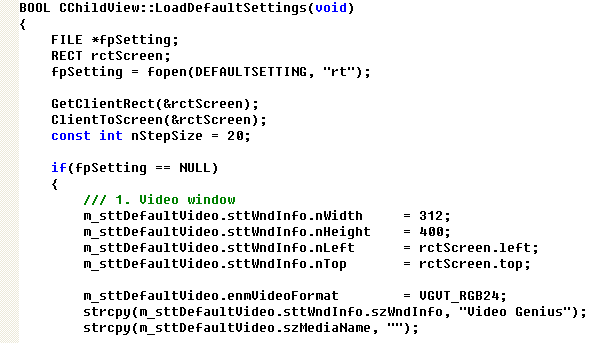
The function member BOOL CChildView::LoadDefaultSettings(void) is used to configure the default setting for all tool windows. Here is the example for the video tool window:
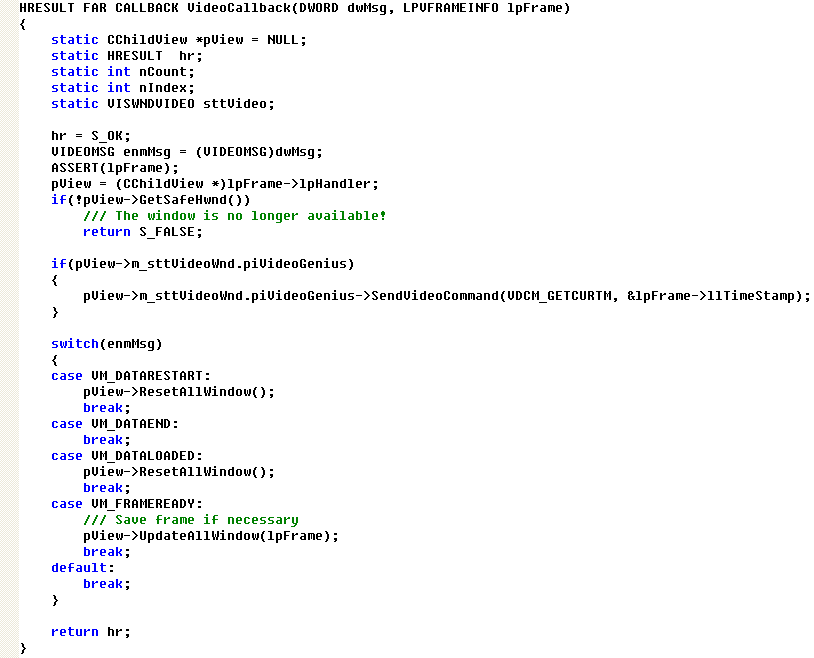
The callback function VideoCallBack() is a very important component.VideoCallBack is called because of several reasons. The input parameter (DWORD dwMsg) describes the reason of the callback. Regarding the details about the callback function, please refer to Video Tool Window. In the implementation below, when the video file is loaded or the video rendering starts, the function CChildView::ResetAllWindow() is called to initialize the status. When a frame is ready to be rendered on the screen, the function CChildView::UpdateAllWindow() is called to refresh the visualization.
The member function BOOL CChildView::UpdateAllWindow(LPVFRAMEINFO lpFrame) is the place where the visualizations of all tool windows are updated. Here is the example for curve window update.

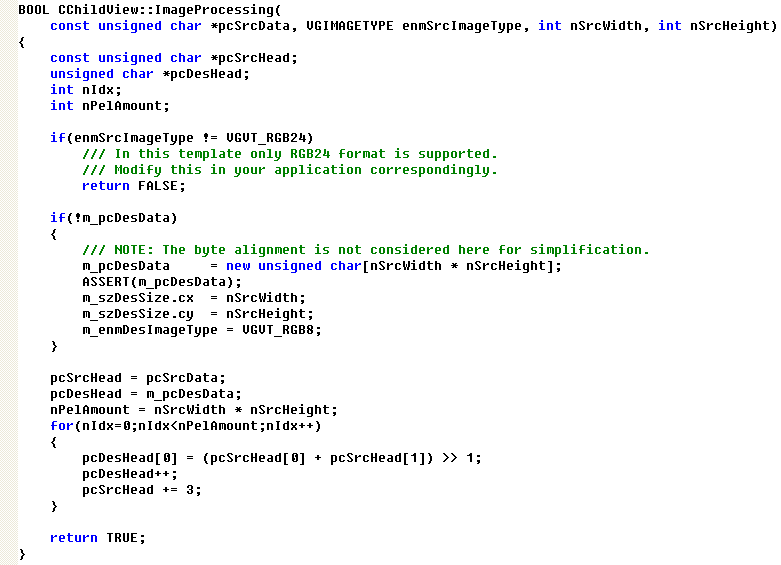
The function member CChildView::ImageProcessing() is the place to write your processing code on each frame. In the example below it just provide some simple implementation: get the approximated luminance value by averaging red and green channel.
Managing Created VisGenie Tool Window
This section lists some most frequently used operation for each type of VisGenie tools. For a full specification please refer to VisGenie Reference.
For a full description of video tool window, please refer to IVideoGenius interface specification
Basic video clip information, such as file name, duration, and resolution, can be obtained through the function IVideoGenius::GetVideoInfo after the video file has been loaded successfully. You may want to prepare some data (such as memory allocation) for the video processing based on the clip information.
Video playback status , such as play, pause, and stop, can be obtained through the function IVideoGenius::GetVideoStatus, which return an enumerative status value.
Callback function is a very important feature for video tool window, probably the most significant difference between VisGenie video tool and any other media player (such as QuickTime, Real Player and Microsoft Media Player). Video tool is the synchronization signal distribution center during video rendering and information visualization. Callback function plays the key role in this synchronization. There are two types of video callback function: frame processing callback and frame rendering callback.
Frame processing callback: this the is most frequently used callback function. VideoCallBack() function generated by AppWizard is such an example. Frame processing callback is activated when a frame is decoded from the bit stream and ready to be rendered. It is claimed as shown below. The dwMsg indicates the reason this callback function is fired. Typical reasons include that the video file is loaded, the rendering starts, the frame is ready, etc. lpFrame contains further frame information such as frame number, timestamp, image data, etc.

Frame rendering callback: this is the callback useful when you want to make additional GDI drawing on the video frame data. For example, you want to track a human face included in a video sequence using a rectange. The input parameter of the callback contains a handle for GDI device context (DC) which is the key parameter for GDI drawing. The following example, taken from the demo project "Video Parser", shows the codes to draw a green rectangle on the tracked object.

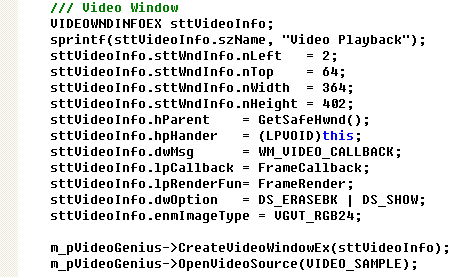
Both the frame processing callback and frame rendering callback functions must be assigned when the video tool is created. The following example, taken from the demo "Video Parser", illustrate how to do this.
Navigating video clips is another useful feature distinguishing VisGenie video tool from other media players. You can precisely locate a video frame based on its timestamp throught the function IVideoGenius::SeekVideo. Moreover, through the function IVideoGenius::SendVideoCommand you can define a segment in the video clip and only the video frames within this segment will be rendered. Please see the demo "Shot Cut" for such an example and check its source codes for implementation details.
In VisGenie there are two interfaces related with curve functionality.
ICurveGenius: the kernel interface for curve rendering. All of actual curve drawing functions are defined in ICurveGenius. ICurveGenius only has responsibility to the drawing client region. The class realizing ICurveGenius does not support IGenieToolWnd. Instead IGenieToolWnd is supported by the class who realizes another interface ICurveWnd.
ICurveWnd: the helper interface for ICurveGenius. ICurveWnd encapsulates ICurveGenious by providing a function ICurveGenius *ICruveWnd::GetCurveGenius. It is implemented by a class derived from CGenieToolWnd, which is a class supporting the interface IGenieToolWnd. The reason for this seperate implementations is that by this way VisGenie can have flexiblity to provide curve rendering in wider application scenarios. For example, instead of using a curve tool window, you can realize curve rendering in a static region embedded in a dialog by assigning the window handle of the static region to ICurveGenius directly.
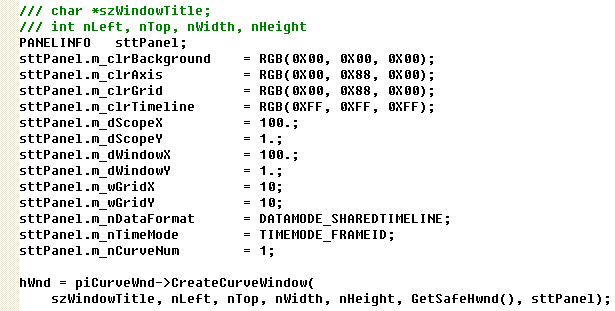
The curve tool window is created through the function ICurveWnd::CreateCurveWindow. Before call this function you need have a PANELINFO strcture ready. Though there are many members in PANELINFO, it is very easy to understand them because they are all mapped to the essential concepts in curve rendering. The following is an example of preparing PANELINFo before call the create function. When the curve tool window is created, use ICruveWnd::GetCurveGenius to obtain the pointer to ICurveGenius. whenever you want to change the setting of the curve window, call the functino ICurveGenius::RemapPanel. On the other hand, you can retrieve the panel information by calling ICurveGenius::GetPanelInfo.
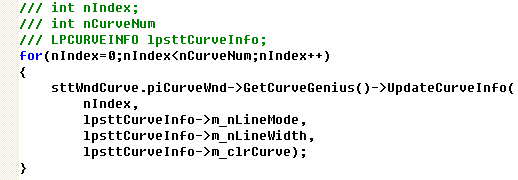
After the curve window is created, you need to add the curves into the tool by calling the function ICurveGenius::UpdateCurveInfo. Depending on the number of curves in the tool window, you may need to call the function several times.
You can also register some reference lines in curve windows by calling ICurveGenius:::RegisterLine.The following codes, taken from the demo project "Shot Cut", register two threshold.

When you want to draw new curve data, call the function ICurveGenius::PlotNewData. If you want to have more freedom in drawing, such as adding texts or 2D shapes, you can call ICurveGenius::GetPanelHDC to obtain the HDC for the client region directly. Alternatively you can call ICurveGenius::OutputText to display text information.
Calling ICurvGenius::ClearAllCurve will remove all curve data stored in the curve tool window.
The image tool window is used to display image that comes form either video frames or externel bitmap files. It display the image in two modes: GDI based mode and DirectDraw based mode. For most of users, GDI mode is enough to fulfill the image rendering purpose, which is also the default mode.
In GDI mode, the image tool window accept three image format: RGB32, RGB24 and 8-bit grayscale images. Call IImageGenius::UpdateImage to update the display with parameter illstrating the image format and data. The following example, taken from the demo project "Video Parser", display a grayscle image in the image tool window.

When you receive upside down image result, call IImageGenius::FlipImage to flip the image vertically.
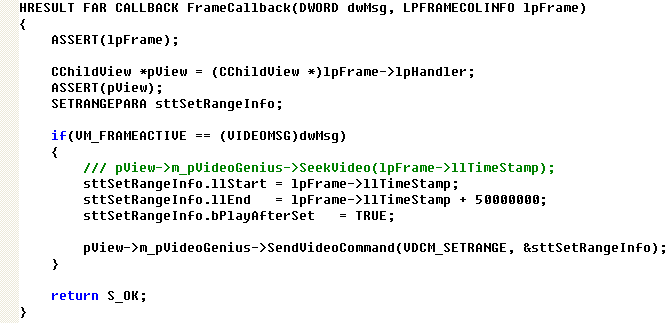
The collection tool window is created through the function IFrameCollection::CreateFrameColWnd. This creator accepts a callback function, which will be fired when you click on any image in the collection. You can take further response accordingly. For example, The following codes, taken from the demo project "Shot Cut", navigate the video clip to the specified location where the frame is collected.
To add a frame data into the collection, call IFrameCollection::AddNewItem. To set the collection memo information, call IFrameCollection::SetCollectionInfo.
You can also get the information of the collection through several functions. IFrameCollection::GetCollectionInfo returns the collection memo information. IFrameCollection::GetCollectionSize returns theh number of images in the collection. IFrameCollection::GetItem return information of the specified image. IFrameCollection::ClearCollection is used to clean current image collection.
The object tool is suitable for the visualization of discreate concepts, such as Play/Break in soccer game, appearance of different objects, and classification. Please see the demo "Soccer Game Parse" for an example using object tool window.
The object tool window is created through the function IObjSpyWnd::CreateObjSpyWnd. Use IObjSpyWnd::UpdateSingleObj to add / remove an object from the client region. Use IObjSpyWnd::ClearObjects to clear all objects and reset the window.
Use the function IObjSpyWnd::GetObjSpyInfo. to get current object tool window information. When you want to update the object view dynamically, use the functionRemapObjView. The following codes, taken from the demo project "Shot Cut", show the procedure to clear the tool window, update the tool window information, and remap the client region:

3D tool window provides the fundamental visualization supports for 3D object rendering. Similar as the curve tool window, there are two interfaces related with 3D tool window:
I3DGenius: the kernel interface for 3D scene rendering. All of actual rendering functions are defined in I3DGenius. I3DGenius only has responsibility to the drawing client region. The class realizing I3DGenius does not support IGenieToolWnd, the essential interface for every tool window. Instead IGenieToolWnd is supported by the class who realizes another interface I3DSceneWnd.
I3DSceneWnd: the helper interface for I3DGenius. I3DSceneWnd encapsulates I3DGenious by providing a function I3DSceneWnd::Get3DGenius. It is implemented by a class derived from CGenieToolWnd, which is a class supporting the interface IGenieToolWnd. The reason for this seperate implementations is that by this way VisGenie can have flexiblity to provide 3D rendering in wider application scenarios. For example, instead of using a 3D tool window, you can realize 3D scene rendering in a static region embedded in a dialog by assigning the window handle of the static region to I3DGenius directly.
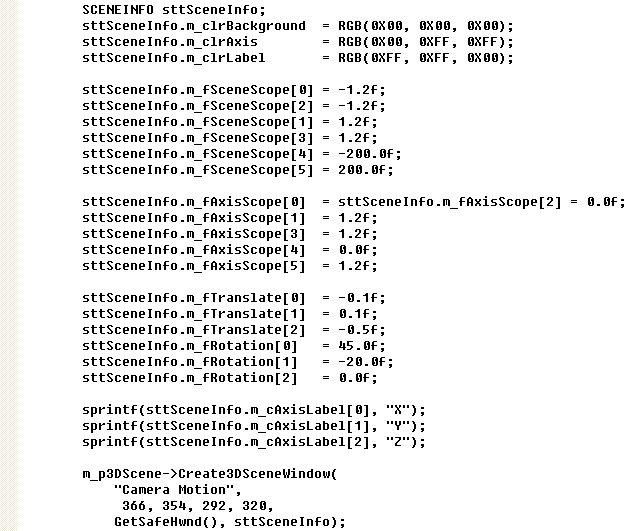
The 3D tool window is created through the function I3DSceneWnd::Create3DSceneWindow. Before call this function you need have a SCENEINFO strcture ready. Though there are many members in SCENEINFO, it is very easy to understand them because they are all mapped to the essential concepts in 3D rendering. The following is an example of preparing SCENEINFO before call the create function. When the 3D tool window is created, use I3DSceneWnd::Get3DGenius to obtain the pointer to I3DGenius. whenever you want to change the setting of the curve window, call the functino I3DGenius::RemapScene. On the other hand, you can retrieve the scene information by calling I3DGenius::GetScenelInfo.
The 3D tool window supports several 3D objects, such as point, line, cube, polygon, sphere, and cylinder. All of these rendering are implemented through a uniform function I3DGenius::RenderAtom. To call this function you need to prepare an ATOM3D structure. The following code examples show how to create a cube in the scene.
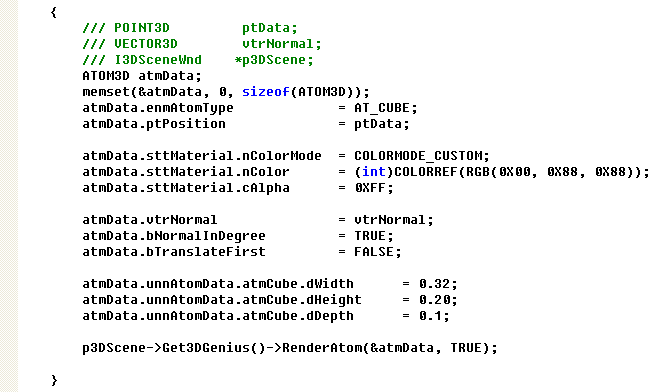
Whenever you want to reset current 3D scene and remove all objects, call the function I3DGenius::ClearAllAtoms. To refresh the display explicitly, call the functions I3DGenius::RefreshScene and I3DGenius::RefreshData. As indicated by the name, these two functions refresh the scene (but don't redraw the objects) and the objects (but don't refresh the scene) respectively. The refresh functions are seperated for flexible control and the same logic also applies to other similar tool windows, such as curve tool window.
Browser tool window provides the fundamental supports for online webpage browsing. Furthermore, since it is based on the Internet Explorer ActiveX control, virtually it can support any media content that is supported by Microsoft Internet Explorer, such as html, images, videos, pdf, flash, etc.
Browser tool window is created by calling the function IBrowserWnd::CreateBrowserWindow. To update the URL, call the function IBrowserWnd::GotoURL.
| Summary |
In this document you learn the basic usage of VisGenie SDK, which is the kernel part of VisGenie. To learn more information, please refer to Using VisGenie Demo Studio and VisGenie Reference.

